January 14, 2017
Python - Creating a Table using PyGt5
PyGt5 is pretty nice when it comes to constructing some nice tables. I found that making tables in PyGt5 is easier than Gtk. So I thought I would just show you how to create a really quick python script to take a file such as the one below and create a table from it in a frame. Create the following text file below as example.txt and make sure you add those , because we are going to be later spliting by ',' to get each of the element and place them into the table.
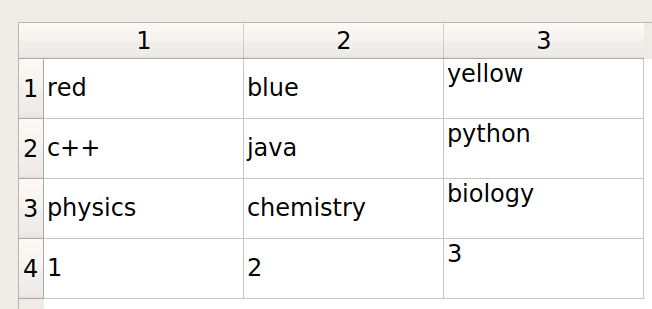
red,blue,yellow
c++,java,python
physics,chemistry,biology
1,2,3
pip install pyqt5
#!/usr/bin/env python
import sys
from PyQt5.QtWidgets import QMainWindow, QApplication, QWidget, QAction, QTableWidget,QTableWidgetItem,QVBoxLayout
from PyQt5.QtGui import QIcon
from PyQt5.QtCore import pyqtSlot

class App(QWidget):

    def __init__(self):
        super().__init__()
        self.title = 'PyQt5 table - pythonspot.com'
        self.left = 0
        self.top = 0
        self.width = 300
        self.height = 200
        self.initUI()

    def initUI(self):
        self.setWindowTitle(self.title)
        self.setGeometry(self.left, self.top, self.width, self.height)

        self.createTable()

        # Add box layout, add table to box layout and add box layout to widget
        self.layout = QVBoxLayout()
        self.layout.addWidget(self.tableWidget)
        self.setLayout(self.layout)

        # Show widget
        self.show()

    def createTable(self):
       # Create table
        self.tableWidget = QTableWidget()
        self.tableWidget.setRowCount(4)
        self.tableWidget.setColumnCount(2)
        self.tableWidget.setItem(0,0, QTableWidgetItem("Cell (1,1)"))
        self.tableWidget.setItem(0,1, QTableWidgetItem("Cell (1,2)"))
        self.tableWidget.setItem(1,0, QTableWidgetItem("Cell (2,1)"))
        self.tableWidget.setItem(1,1, QTableWidgetItem("Cell (2,2)"))
        self.tableWidget.setItem(2,0, QTableWidgetItem("Cell (3,1)"))
        self.tableWidget.setItem(2,1, QTableWidgetItem("Cell (3,2)"))
        self.tableWidget.setItem(3,0, QTableWidgetItem("Cell (4,1)"))
        self.tableWidget.setItem(3,1, QTableWidgetItem("Cell (4,2)"))
        self.tableWidget.move(0,0)

        # table selection change
        self.tableWidget.doubleClicked.connect(self.on_click)

    @pyqtSlot()
    def on_click(self):
        print("\n")
        for currentQTableWidgetItem in self.tableWidget.selectedItems():
            print(currentQTableWidgetItem.row(), currentQTableWidgetItem.column(), currentQTableWidgetItem.text())

if __name__ == '__main__':
    app = QApplication(sys.argv)
    ex = App()
    sys.exit(app.exec_())
So you should have it like this so far. And if you run it you'll see a cell 4 by 2. So now lets get to editing this to make it take from the example.txt so we'll go stright to createTable and edit that method specifically since that is what we want. Change it to the following...
    def createTable(self):
       # Create table
        elements = []
        f = open('example.txt','r')

        for line in f.readlines():
            elements.append(line.split(","))

        f.close()

        self.tableWidget = QTableWidget()
        self.tableWidget.setRowCount(len(elements))
        self.tableWidget.setColumnCount(3)

        for i in range(len(elements)):
            self.tableWidget.setItem(i, 0, QTableWidgetItem(elements[i][0]))
            self.tableWidget.setItem(i, 1, QTableWidgetItem(elements[i][1]))
            self.tableWidget.setItem(i, 2, QTableWidgetItem(elements[i][2]))

        # table selection change
        self.tableWidget.doubleClicked.connect(self.on_click)
elements = []
f = open('example.txt','r')
for line in f.readlines():
   elements.append(line.split(","))

f.close()
self.tableWidget = QTableWidget()
self.tableWidget.setRowCount(len(elements))
self.tableWidget.setColumnCount(3)
for i in range(len(elements)):
   self.tableWidget.setItem(i, 0, QTableWidgetItem(elements[i][0]))
   self.tableWidget.setItem(i, 1, QTableWidgetItem(elements[i][1]))
   self.tableWidget.setItem(i, 2, QTableWidgetItem(elements[i][2]))
The majority of the rest of the code is just to set up the frame which is not so vital but now you can create tables from a .txt file which is amazing and can extend this even further and create some graphs using matplotlib which is built into PyGt5.